Using tensorflow object detection API
Overview
The objective for this exercise is to learn to how use tensorflow-research open source tools, and evaluate how practical it is in real production and research scenario as well. For this tutorial we are going to training our model to do face detection using Tensorflow object detection API. All the commands I will be suing can be found in more detail in Tensorflow Object Detection Repository Documentaion.
Tensorflow object detection API has a selection of trainable detection models, including:
- Single Shot Multibox Detector (SSD) with MobileNets
- SSD with Inception V2
- Region-Based Fully Convolutional Networks (R-FCN) with Resnet 101
- Faster RCNN with Resnet 101
- Faster RCNN with Inception Resnet v2
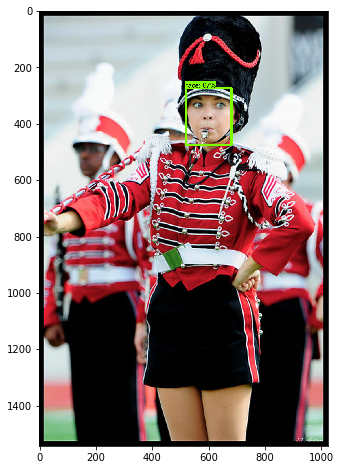
Feel free to use any dataset and pertain model. For this tutorial, I will be using dataset WIDERFace and pre-train model ssd_mobilenet_v1_coco
If you face any errors while doing this tutorial take a pick to at the last section of this blog for the errors and solutions I got. For the most part if you are using python3 make sure you have installed Tensorflow using pip3, otherwise uninstall Tensorflo and install it again using
pip3 --upgrade Tensorflow.
1. Dowload Tensorflow-models
Tensoflow object detection api is in side Tensorflow-models repository. For this tutorial, I will cloning it to this location “/tmp/” and renaming it to look like this:
C:\tmp\tensorflow_models\models\research
2. Set slim path
Tensorflow-object detection api makes reference to slim files. To setup tensorflow slim path run the following commands:
    windows:
    set PYTHONPATH=C:\tmp\tensorflow_models\models\research;C:\tmp\tensorflow_models\models\research\slim;

    linux:
    export PYTHONPATH=$PYTHONPATH:`pwd`:`pwd`/slim
To initilaize your new path, close your terminal and open it again tested by typing:echo %PYTHONPATH% your should see both paths as an output.
3. Download and compile protobuf libraries
Download Windows protobuf binary and install it. Make sure to use version 3.4.0-win32; In my experience 3.5 version has issues. Once you unzipped the folder, you will find a /bin directory which is the one that needs to be added to your PATH, eg: D:\some_path\protoc-3.4.0-win32\bin. Example:
Install binary
    cd C:\tmp\tensorflow_models\models\research
    C:\tmp\tensorflow_models\protoc-3.4.0-win32\bin\protoc object_detection/protos/*.proto --python_out=.
Download protobuf repo unzip it, go to ‘protobuf-master/python’ and run:
    python setup.py build
    python setup.py install
    python setup.py test
4. Download dataset and pre-trained model
To make it easy to prepare dataset for training I will be using 4 script files found in this repository. Go to your project directory and run the script 001_down_data.py. This script will will be downloading dataset WIDERFace and ssd_mobilenet_v1_coco. As a note, tt is good practice to start with a pre-trained model; a pre-train model with similar dataset features can help speed up training process.
python 001_down_data.py
5. Prepare dataset for training
TensorFlow Object Detection API requires all the labeled training data to be in TFRecord file format. The change of order we would be doing is VOC PASCAL-> CSV -> the tfrecord. Note: If you are doing your own dataset you can use labelImg to mark the bounding boxes and labelImg will output your dataset in VOC PASCAL format.
    python 002_data-to-pascal-xml.py
    python 003_xml-to-csv.py
    python 004_generate_tfrecord.py
6. pipeline.config and .pbtxt file
Before training, modify model pipeline.config file to match your project. The config files are located in this directory {dir}\models\research\object_detection\samples\configs. For this tutorial I will be using “ssd_mobilenet_v1_face.config”. In this file contains all the parameter for your model, change them to fit your needs. The main fields that need to match your project are num_classes, fine_tune_checkpoint, input_path and label_map_path. Example:
      fine_tune_checkpoint: "./data/ssd_mobilenet_v1_coco_11_06_2017/model.ckpt"
      from_detection_checkpoint: true
      data_augmentation_options {
        random_horizontal_flip {
        }
      }
      data_augmentation_options {
        ssd_random_crop {
        }
      }
    }

    train_input_reader: {
      tf_record_input_reader {
        input_path: "./data/train.record"
      }
      label_map_path: "face_label.pbtxt"
    }

    eval_config: {
      num_examples: 40
    }

    eval_input_reader: {
      tf_record_input_reader {
        input_path: "./data/val.record"
      }
      label_map_path: "face_label.pbtxt"
      shuffle: false
      num_readers: 1
    }
.pbtx file contains the labels for the dataset in the following format.
    item {
      id: 1
      name: 'face'
    }
7. Train and evaluate
The documentation for the flowing commands can be found in Tensorflow-models running_locally documentation at this point my project directory structure looks like this:
project_directory/
    |_face_label.pbtxt
    |_ssd_mobilenet_v1_face.config
    |_data/
        |_ssd_mobilenet_v1_coco_11_06_2017/
            |_model.ckpt
        |_train.record
        |_val.record
A local training job from my project dir can be run with the following command:
    python C:\tmp\tensorflow_models\models\research\object_detection\train.py \
    --logtostderr --pipeline_config_path=ssd_mobilenet_v1_face.config  \
    --train_dir=model_output
Where “pipeline_config_path” points to the pipeline config and “train_dir” points to the directory in which training checkpoints and events will be written to. By default, the training job will run indefinitely until the user kills it.
A local validation job from my project dir can be run with the following command:
python C:\tmp\tensorflow_models\models\research\object_detection\eval.py --logtostderr --pipeline_config_path=ssd_mobilenet_v1_face.config --checkpoint_dir=model_output --eval_dir=eval
Where “pipeline_config_path” points to the pipeline config in our case ssd_mobilenet_v1_face.conf, train_dir points to the directory in which training checkpoints were saved (same as the training job) and $eval_dir points to the directory in which evaluation events will be saved. As with the training job, the eval job run until terminated by default.
8. Create a frozen_inference_graph.pb
The command bellow freezes your graph so you can used it in a application
python C:\tmp\tensorflow_models\models\research\object_detection\export_inference_graph.py --input_type image_tensor --pipeline_config_path ssd_mobilenet_v1_face.config --trained_checkpoint_prefix model_output/model.ckpt-160 --output_directory model/
Example using frozen_inference_graph.pb
In the following code example you can see two methods one theat creates the graph and another one to run the session. The frozen graph is uploaded and session returns image_tensor, boxes, scores, classes and detection.
    class TrafficLightClassifier(object):
        def __init__(self):
            PATH_TO_MODEL = 'frozen_inference_graph.pb'
            self.detection_graph = tf.Graph()
            with self.detection_graph.as_default():
                od_graph_def = tf.GraphDef()
                # Works up to here.
                with tf.gfile.GFile(PATH_TO_MODEL, 'rb') as fid:
                    serialized_graph = fid.read()
                    od_graph_def.ParseFromString(serialized_graph)
                    tf.import_graph_def(od_graph_def, name='')
                self.image_tensor = self.detection_graph.get_tensor_by_name('image_tensor:0')
                self.d_boxes = self.detection_graph.get_tensor_by_name('detection_boxes:0')
                self.d_scores = self.detection_graph.get_tensor_by_name('detection_scores:0')
                self.d_classes = self.detection_graph.get_tensor_by_name('detection_classes:0')
                self.num_d = self.detection_graph.get_tensor_by_name('num_detections:0')
            self.sess = tf.Session(graph=self.detection_graph)

    def get_classification(self, img):
        # Bounding Box Detection.
        with self.detection_graph.as_default():
            # Expand dimension since the model expects image to have shape [1, None, None, 3].
            img_expanded = np.expand_dims(img, axis=0)
            (boxes, scores, classes, num) = self.sess.run(
                [self.d_boxes, self.d_scores, self.d_classes, self.num_d],
                feed_dict={self.image_tensor: img_expanded})
        return boxes, scores, classes, num
Possible issues and solutions
error 0: Import Error: cannot import name ‘self_check’
solution:
pip uninstall tensorfloworpip uninstall tensorflow-gpupip install --upgrade tensorfloworpip3 install --upgrade tensorflow-gpuor if you are using anaconda Tensoflow version will be behind but it should work:conda install -c conda-forge tensorfloworconda install -c conda-forge tensorflow-gpu
I tried this and it worked and didn't had any effect on training.
error 1: tf.contrib.slim.tfexample_decoder.Image doesn’t have dct_method
solution: edit tf_example_decoder.py line 110 to remove dct_method=dct_method. I tried this and it worked and didn’t had any effect on training.
error 2: PIL: DLL load failed: specified procedure could not be found
solution: Avoided the problem by uninstalling pillow (4.1.0) and then installing an older version of pillow (4.0.0).
error 3: ModuleNotFoundError: No module named ‘pycocotools’
solution: You can replace extra_compile_args=[‘-Wno-cpp’, ‘-Wno-unused-function’, ‘-std=c99’] with extra_compile_args={‘gcc’: [‘/Qstd=c99’]} in ./libs/datasets/pycocotools/setup.py. maybe help
error 4: Installation on Windows Command line error D8021 : invalid numeric argument ‘/Wno-cpp’
solution: install coco; you can do it vy running the following commands: git clone https://github.com/pdollar/coco.git cd coco/PythonAPI python setup.py build_ext install
installation: how to install tensorflow using anaconda:
solution: conda install -c conda-forge tensorflow
Reference
All the commands used can be found in more detail in Tensorflow Object Detection Repository Documentaion. This tutorial has been an adaptions of this repository